
You can manage a WordPress site with ChatGPT or Claude using WPVibe. It’s a free plugin that connects both AI tools directly to your site.
We tested it by connecting Claude to our demo travel site and giving it real tasks. Within a few minutes, it found a broken link, listed every post missing a meta description, and flagged a plugin and four themes that needed updating.
In this guide, we’ll show you how to set up WPVibe with ChatGPT and Claude. You’ll also learn how to use it for common tasks and follow a few habits that prevent unwanted changes to your site.
Here is a list of all the topics we’ll cover in this guide:
What it Really Means to Manage WordPress with AI
Managing your WordPress site with AI means connecting ChatGPT or Claude to your site. From there, you give instructions through the chat interface you already use, and the assistant reads your content and makes changes directly in WordPress.
This is not about adding a chatbot to your site for visitors, which is what many people picture first. Instead, the assistant you already use does the admin work for you.
There are three ways to bring AI into WordPress, and this direct connection is the most flexible. The other two are more limited, as the comparison below shows.
The third approach works because of MCP, short for Model Context Protocol. Think of it like a universal charger, where one plug works for every device instead of a different cord for each.
MCP does the same for AI. One assistant can work with your WordPress site, your calendar, or your files without a separate connection for each.
To get this working on your own site, you connect your WordPress site to ChatGPT or Claude, which is what the rest of this guide walks you through.
What You Need Before You Connect ChatGPT or Claude to WordPress
We recommend the WPVibe plugin to connect ChatGPT, Claude or your favorite AI agent to WordPress because it’s an MCP server built for exactly that job.
You’ll also need:
Self-hosted WordPress from WordPress.org, publicly reachable, with the REST API enabled. This won’t work on WordPress.com.
A ChatGPT, Claude, or Cursor account that supports custom connectors or MCP servers. Claude allows this on every plan, including the free plan, though the free plan only gives you one connector. ChatGPT also works on the free plan through its app directory.
How to Connect ChatGPT or Claude to Your WordPress Site
Start in your WordPress dashboard by installing and activating the WPVibe plugin. If you haven’t done that before, our guide on how to install a WordPress plugin walks you through it.
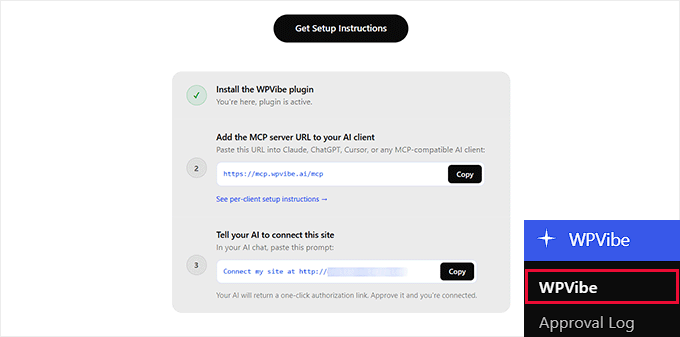
Once the plugin is active, a new WPVibe item appears in your admin menu. Open it, and you’ll find the server address your AI assistant (ChatGPT, Claude, etc) needs, along with an authorization prompt.
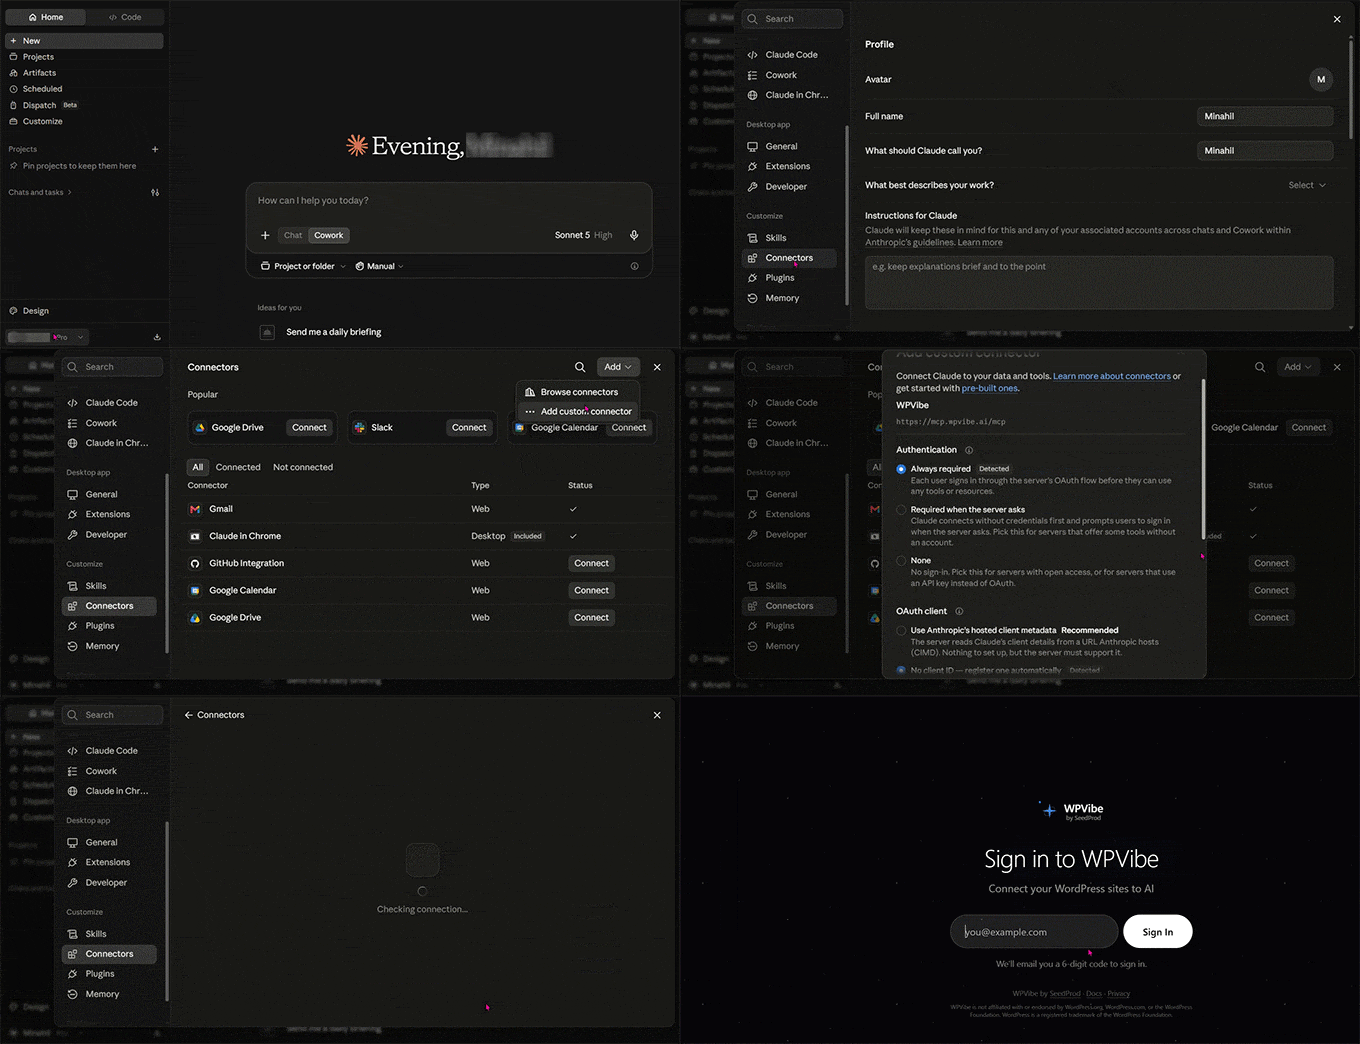
Next, tell your AI assistant where that server is. In Claude, open Settings » Connectors, click ‘Add’ in the top right, and choose ‘Add custom connector.’
Claude asks for two things. Give it a name you’ll recognize in your connectors list, such as WPVibe.
Then, paste https://mcp.wpvibe.ai/mcp into the ‘Remote MCP server URL’ field and click ‘Continue’.
The next screen asks you to authorize the connection. This takes you to the WPVibe website, where you sign in with your email and enter the six-digit code it sends you.
After that, return to your WordPress dashboard and copy the authorization prompt provided by WPVibe.
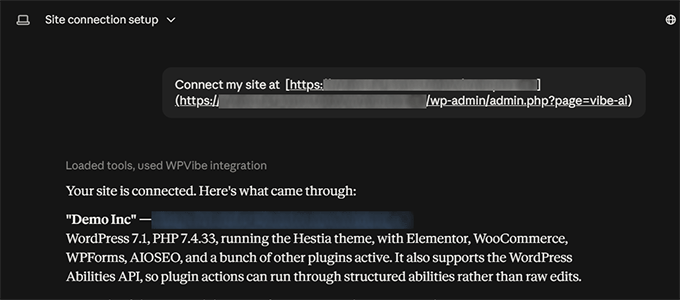
Now, open a new Claude chat and paste the prompt. Claude returns a one-click authorization link. Click it and approve the connection to finish.
ChatGPT works a little differently. Open Plugins in the ChatGPT sidebar, which is ChatGPT’s own directory of tools and has nothing to do with WordPress plugins.
Type WPVibe into the search box and click the + button next to the result.
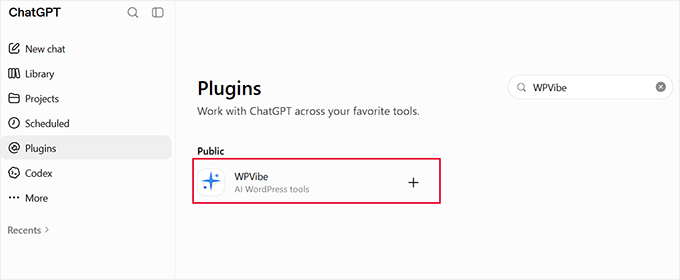
ChatGPT opens a WPVibe sign-in page in a new tab, where you enter your email address and it sends you a six-digit code to confirm the connection.
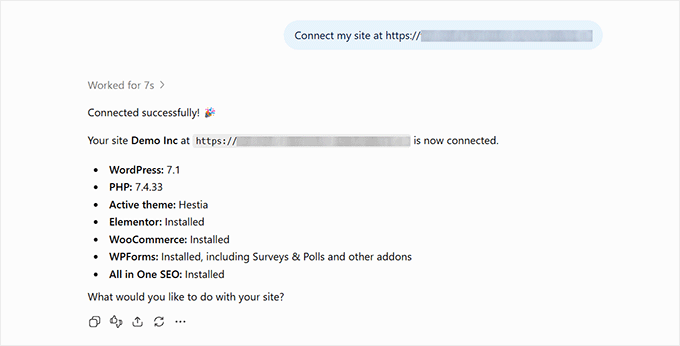
Then, go back to your WordPress dashboard, copy the authorization prompt, and paste it into a new chat. The connection goes live right away.
ChatGPT attaches WPVibe per conversation, not permanently. In any new chat, click the + button in the message box and choose WPVibe, or it answers from the web instead of your site.
If you use Cursor or Windsurf instead, or you want more detail on any of these steps, see our guide on how to connect AI agents with WordPress using MCP.
Use Case 1: Create and Edit Content
Writing content for every blog post, page, and product listing takes time, and it only grows as your site does.
An AI assistant connected to WordPress can write and publish that content directly, so you don’t have to copy it from a chat window into the WordPress editor.
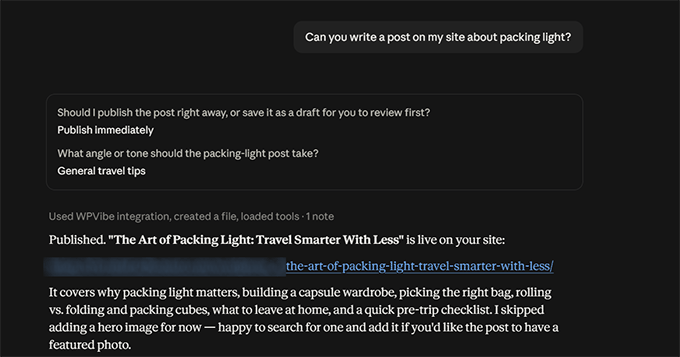
On our demo travel site, we asked for a post about packing light. It wrote the draft, applied the block formatting, assigned a category, and asked whether we wanted a draft or a live post.
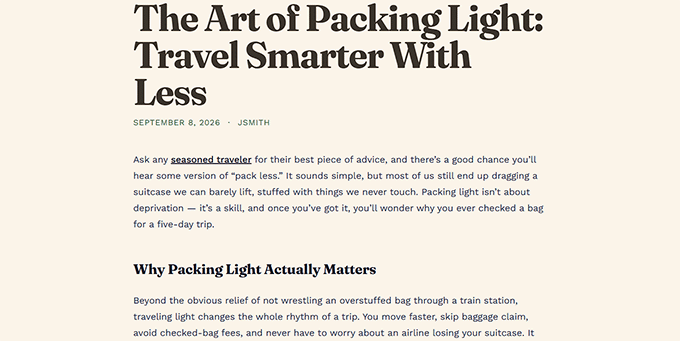
Here is the finished post as it appeared on our site.
You can also edit content that you’ve already published.
Give the assistant the URL of a live post and ask it to tighten the introduction, add a section, or fix the heading structure. It works on the real post rather than a copy.
The same applies to your media library. We asked it to add alt text to 50 images that didn’t have one, and it completed the process in about 10 minutes.
Use Case 2: Maintain the Website
Site maintenance piles up quietly. Broken links, outdated plugins, and wrong settings go unnoticed when nobody is checking, and a connected assistant can run those checks whenever you ask.
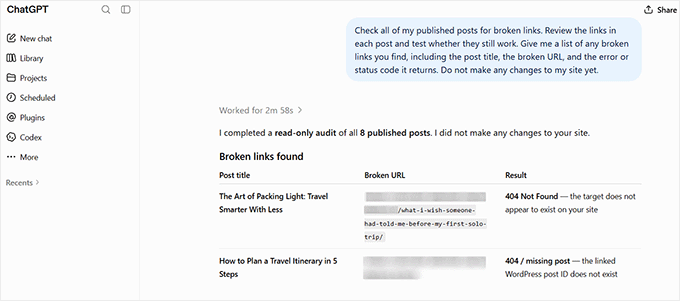
Finding broken links is a good example. Ask the assistant to check your published posts, and it reviews your content, identifies the links, and tests whether they still work.
On our demo travel site, it found a post linking to an article we had deleted. It then opened the URL to confirm that it returned a “Page not found” error instead of assuming the link was broken.
Checking for outdated plugins and themes is just as simple even if you’re managing multiple WordPress sites. With a single prompt, you can update all your WordPress plugins, themes, and the core WordPress software.
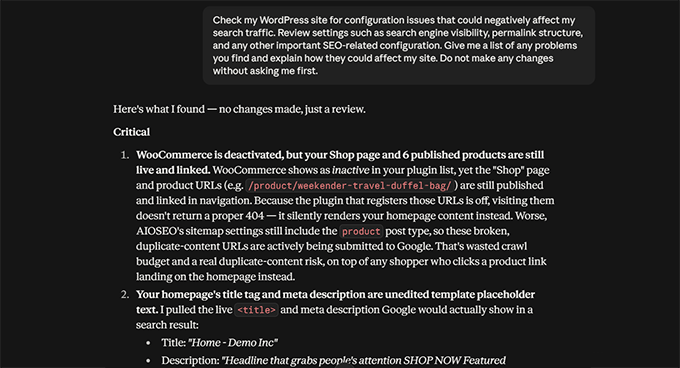
You can also use it to check for configuration problems that could quietly affect your traffic. For example, it confirms that your site isn’t hidden from search engines and checks whether your permalinks use a readable structure instead of post ID numbers.
Use Case 3: How to Automate WordPress SEO with AIOSEO
A food blog with 300 recipes and no dedicated SEO team can’t realistically write every meta description by hand.
This is the kind of job that makes the whole setup worth it. It requires an SEO plugin that works with AI, like All in One SEO , which gives your connected assistant access to real SEO data and the tools to act on it, instead of just guessing.
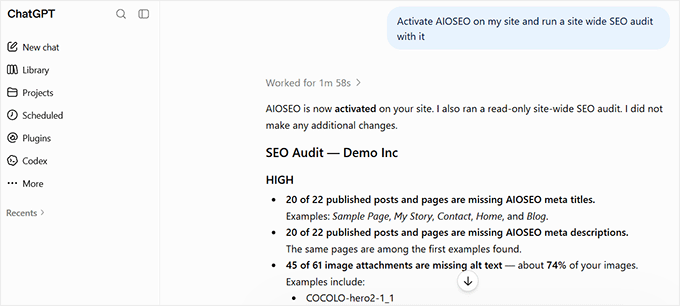
If you don’t have it installed, ask Claude or ChatGPT to install and activate it, then run a site-wide audit to see what needs attention.
The assistant checks your homepage SEO score, sitemap status, and custom robots rules. It reports everything in one place.
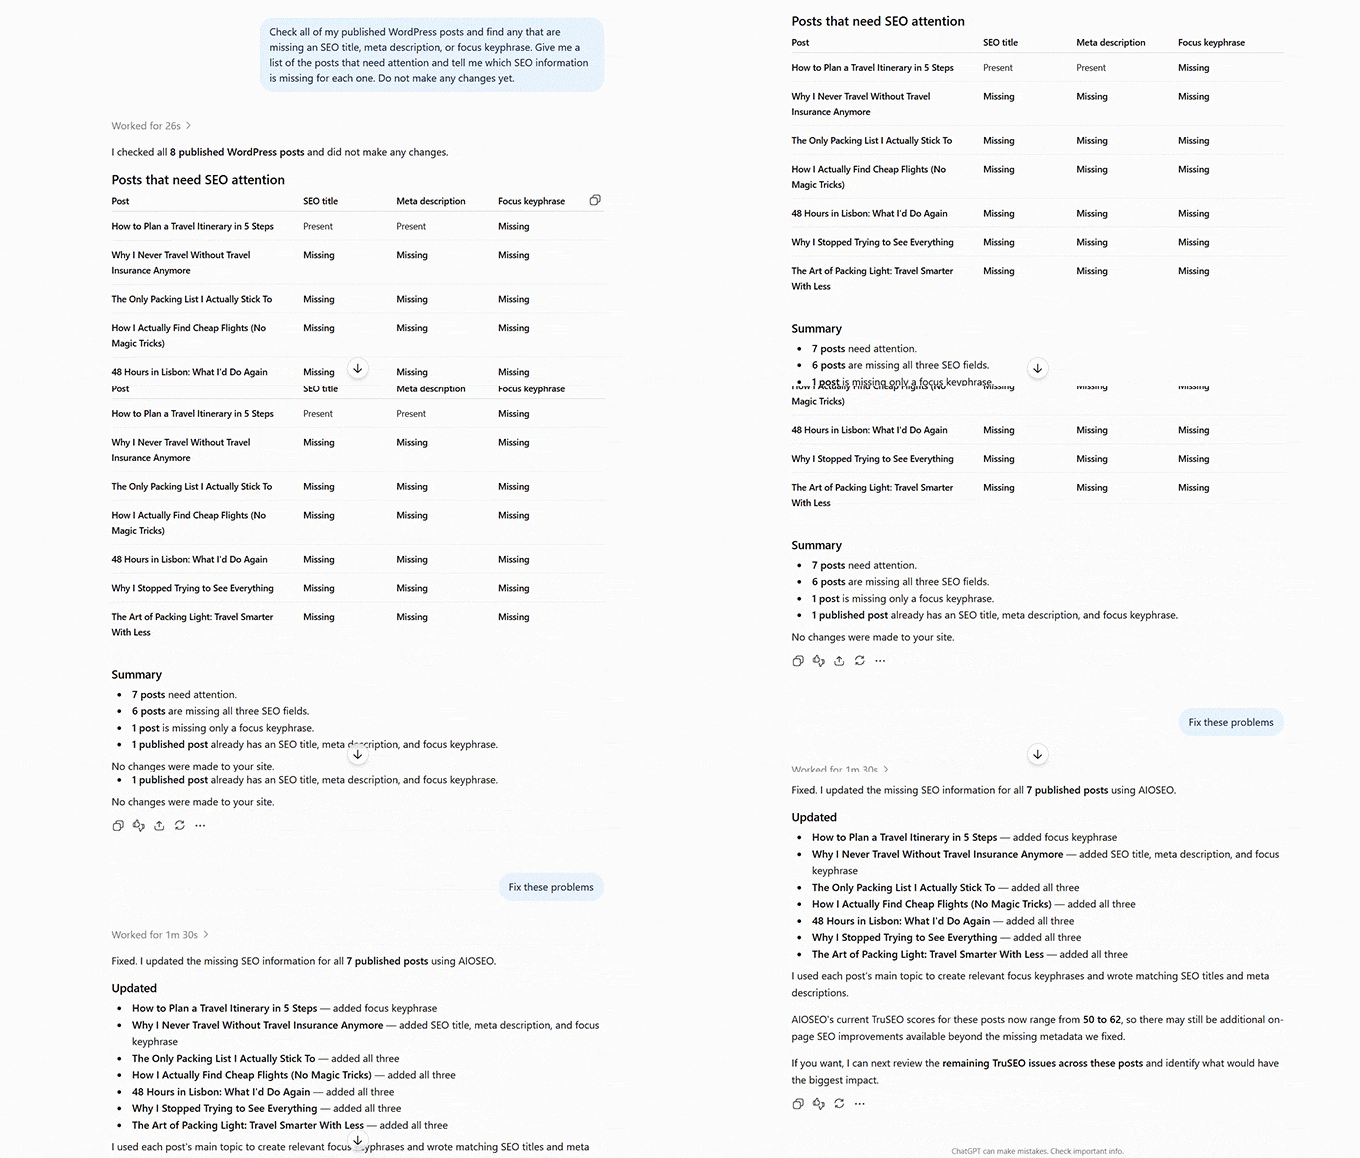
You can also ask which posts need attention, and the assistant lists every published post missing an SEO title, meta description, or focus keyphrase.
You can then fix those gaps at scale. The assistant writes and saves an SEO title, meta description, focus keyphrase, and canonical URL.
We tested this on a post, and it filled in all four fields correctly.
WPVibe’s free plan allows 100 actions a day. A cleanup this size runs over a few days on the free plan, or in one session on Pro.
Finally, if you’re on AIOSEO’s Elite plan and have connected Google Search Console to it, the assistant pulls clicks, impressions, click-through rate, and average position for a selected date range.
How to Stop AI from Breaking Your Live WordPress Site
WPVibe comes with built-in guard rails that put you incharge. It asks for approval before any critical action and nothing goes live without you saying so. However, AI connected to your live site can make a change you didn’t mean for it to make.
The habits below are what limit that risk, and most of them are one-time decisions you set up before your first real session.
Give it its own WordPress user account. Use an Editor account for content work. If you want the assistant to handle maintenance or SEO tasks that require administrator permissions, you’ll need to assign it an Administrator role. Log in to WordPress using this dedicated account before connecting WPVibe.
Know how to remove access. WordPress connects the assistant through application passwords, which create a separate password for each external tool. If something looks wrong, go to Users » All Users, open the user you connected with, and delete the WPVibe entry under Application Passwords.
Review every approval before confirming it. In our test, WPVibe paused when we asked it to permanently delete a post and sent us an approval link showing what would change. Read exactly what it will do before you confirm any approval.
Don’t assume delete always means trash. We confirmed that regular and bulk WooCommerce deletes move items to the trash, which can be recovered if you want to. However, WPVibe can permanently delete items if you ask for a force-delete. Read the approval request before you confirm one.
Be clear about what should go live. New posts default to drafts, and in our test, Claude asked for confirmation before publishing one. WPVibe also keeps code and theme changes inactive until you enable them. Still, be explicit about what needs your review before anything goes live rather than relying on these safeguards.
Check the approval log after each session. Go to WPVibe » Approval Log for a record of major actions, including who made them, what ran, and the result. A quick review helps you catch changes you didn’t notice during the session.
Take a backup before your first real session. Nothing above replaces a proper backup. For anything that affects your entire catalog or post archive, test it on a staging site first.
FAQs About Managing WordPress with ChatGPT and Claude
Does WPVibe work with Gemini or other AI assistants?
It works with any assistant that supports MCP, which today covers Claude, ChatGPT, Cursor, Windsurf, Perplexity, Grok, and Antigravity.
The free Gemini app can’t add custom MCP servers. Gemini Spark on Google’s paid AI Pro and AI Ultra plans can. Go to Settings & help » Connected Apps » Custom apps for Spark, click ‘Add a custom app’, and paste the WPVibe server URL.
On a free Google account, you can reach WPVibe through Google’s Antigravity coding tool, though that’s a developer setup rather than the regular Gemini app.
How much does it cost to run?
The WPVibe plugin is free, and the free plan covers 100 tool calls per day. That’s enough for regular content and maintenance work.
However, bulk jobs across hundreds of posts are what push you past it. The Pro plan costs $99 per year and raises the limit to 500 calls a day with priority support.
Will it work with Elementor or my page builder?
Yes, and the connection recognizes when a site uses Elementor, Divi, Beaver Builder, Bricks, or Breakdance.
Page builders store their content differently from the standard editor, and the assistant uses the right save path for your builder instead of writing over the layout. It’s still worth testing on one page before letting it work through a batch of them.
We hope this article helped you learn how to manage your WordPress site with ChatGPT or Claude. You may also want to see our guide on the best AI automation tools and how to optimize your content for Google AI Overviews.
If you liked this article, then please subscribe to our YouTube Channel for WordPress video tutorials. You can also find us on Twitter and Facebook.